For a long time I wondered if I should come back to this blog. I’ve always been making bread in some capacity, but I worried that it would be weird if I posted again after a long hiatus. What would people think when they saw a notification in their inbox from a blog they followed maybe 6 years ago? What if they immediately unfollowed me? What if they read the post and realized it was bad? There were a million reasons to do nothing. But I also realized that I don’t really care about any of those things anymore. I love bread. I love making it, I love eating it, and I love sharing it. I want this to be a place where people can go to find straightforward, tested recipes that have been made with thought and love, even if “people” is only me. I’ve learned a lot in the last few years and I can’t wait to share it all with you. We’re back baby!
Without further ado, here’s an airy and reliable recipe for overnight white sourdough bread!
Step 1: Build the Sourdough Starter
Creating a sourdough starter is a whole thing. It takes about a week and requires you to feed and discard your starter every day until it becomes active. People will tell you it’s easy and fun, but in my experience it feels like a tragic waste until the starter actually becomes active. My personal recommendation is to find someone with a starter and ask them if they would be willing to share some discard.
This is great for three reasons:
- People who maintain a sourdough starter LOVE giving it away. Since starter needs a lot of maintenance one can get quite attached to it, and it’s an honor when you can share that with someone. It feels like something you created is living on.
- When you get starter from someone, you aren’t just getting a jar of goop. You’re getting a jar of goop that has been maintained with love by human hands and that has a story.
- Starter needs to be “fed” every week (depending on your schedule, see the next section for more info), and if we didn’t discard some of it it would grow to be huge. That means that there’s often extra, which we would much rather give to you than throw it away.
Another great option is that you can email or go into your local bakery and ask them if they would be wiling to share some starter with you. There’s a pretty good chance that they’d be thrilled to do this for you, as long as you provide the container! This is exactly what I did after my starter died and I can’t recommend it enough.
Step 1: Maintain the Sourdough Starter
Okay, so you did it! You got a sourdough starter. Whether you made it yourself, you acquired it from a friend, or you got it from a bakery… congratulations! This is a great first step on your sourdough journey. Someday I’ll do a much longer post on all the nuances of maintaining a sourdough starter, but today I’ll give you the cliffnotes version.
First of all, please get a scale. You can get them on Amazon for pretty cheap, and it’s going to help you a lot. I’m going to be using a lot of weight measurement here and it will be really helpful to have.
When you get your starter, no matter where you got it from, you should give it a refresh. Starter is a living thing, you can think of it like a million tiny wild lactobacillaceae feasting on flour and burping gas. What’s really happening is that the bacteria you’re fostering is converting the starch in the flour into sugars, with gas also being a byproduct of that chemical breakdown. But burping is more fun, right? My point is, you have to feed your starter. Otherwise it will run out of food and die. So when you get your starter, feed it using this formula:
- 25g sourdough starter (leftover from the previous time you refreshed it)
- 125g warm water
- 25g whole wheat flour
- 100g white flour
You’re going to think to yourself, “Wait… 25g of starter? That’s like a few tablespoons. And I JUST acquired this WHOLE jar of starter, why would I get rid of most of it?” Sourdough it weird like that. All I can really say at this point is that yeah, it’s weird. But I promise that if you trust the process (even if it’s against your better judgement) you will realize that yeast is very hearty and very hungry. So go for it, discard all but 25g of your original starter and feed that baby some delicious fresh flour and water. I recommend adding the ingredients in the order of the recipe above and stirring between each addition. This way you can make sure the starter is fully dispersed in the water before adding the flour. But honestly, do whatever you want. Whatever makes your heart happy.
After your feed your starter you can do two things. If you want to make bread today or tomorrow you can cover your starter and put it somewhere in your kitchen at room temperature. It’s going to rise to about twice the size it is now, so make sure it’s in a container with plenty of space. If you don’t want to make bread soon you can cover your starter and put it right in the back of your fridge. Once a week I recommend taking it out of the fridge and repeating the feed formula above. You can put it directly back into your fridge or you can make bread, then feed your starter again and then return it to the fridge. The point is your always want your starter to be freshly fed before your refrigerate it. To be fair you can probably leave your starter in the fridge untouched for many weeks before it actually “goes bad”, but I prefer to not risk it and to give it a little spa day once a week or so. Plus that’s about how often I make bread anyway. I know it can seem intimidating having to feed and maintain something like this once a week… *forever*… but you can reframe it. Think of it as a weekly 5 minute opportunity to be mindful about the way you nourish your body. You are doing something good.


Step 3: Make the Levain
I usually refresh my starter either first thing in the morning or right before bed at night. You should do it around 8-12 hours before you want to use it in your dough. For the purpose of simplicity I’m going to assume you feed it in the morning, because that’s what I’m going to do. On the morning the day BEFORE you want to bake your bread, refresh your starter sometime around 7am. Feed your starter the same formula I mentioned above:
- 25g sourdough starter (leftover from the previous time you refreshed it)
- 125g warm water
- 25g whole wheat flour
- 100g white flour
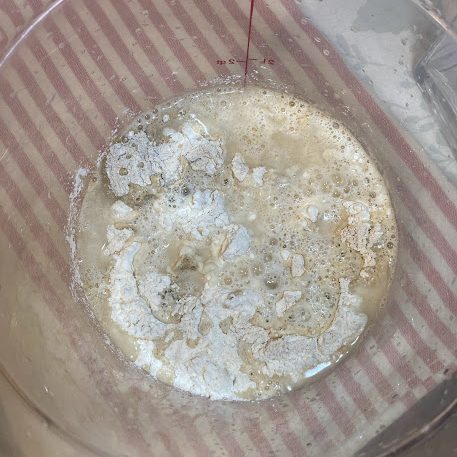
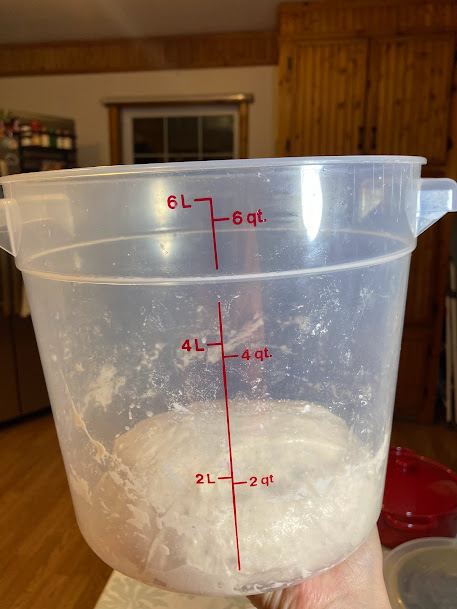
After about 8-12 hours it should look softer, gassy, and rounded around the edges. We call this “active” starter. See the photo above for a reference. At this point your starter is ready to use! Now comes the confusing part. This is what some people call a levain. Levain is just another word used to describe the portion of the starter that you add to your actual dough. Some people use a different formula for their levain than they do for their starter, which is why it has a different name, but I think that’s confusing so for the purpose of this recipe “active starter” = “levain”. In fact, maybe I’ll just call it starter/levain so it isn’t confusing. Ah, stream of consciousness.
ANYWAY, now your have your active starter. And I have good news, the hard part is done! Maintaining a sourdough starter, while not really “hard” in the sense that it takes a lot of hard work, is a commitment. It requires consistent loving care and that’s what you gave it. Excellent work!

Step 4: Make the Autolyse
Another big word. Autolyse just means to mix together your flour and water and let it sit. Did they need to create a whole new word for this? Probably not, but whatever. At this point you should get out a large bowl or large plastic tub. One with a cover is preferable, but if you don’t have that it’s not a big deal. Then add the following:
- 380g white flour
- 35g wheat flour
- 25g rye flour (feel free to substitute wheat flour here)
- 340g warm water
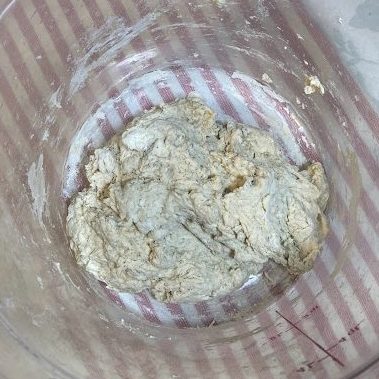
Mix all those bad boys together with a spoon (or your hands if you feel like getting messy). You want to stop mixing as soon as you don’t see any dry flour anymore. If you’re thinking to yourself “is this mixed enough?” you should probably mix for like 30 more seconds. It’s not going to make a difference. When this is done cover the container and let rest for 30 minutes.
Step 5: Mix the Dough
We’re almost there! The next step is to add the two last and most important ingredients. The first is salt. Salt is measured here by volume because it’s a small amount and it’s really hard to measure such a small amount accurately by weight. It’s a SUPER important ingredient because it’s going to being out all of the nuanced flavor of the flour. I’ve forgotten to add it before and I regretted it deeply. The second ingredient is your levain aka your active starter. This is the “yeast” of your bread, and it’s what’s going to make your bread light and airy instead of lumpy and dense.
Add the following to your autolyse mixture:
- 2 teaspoons salt
- 110g levain/active starter
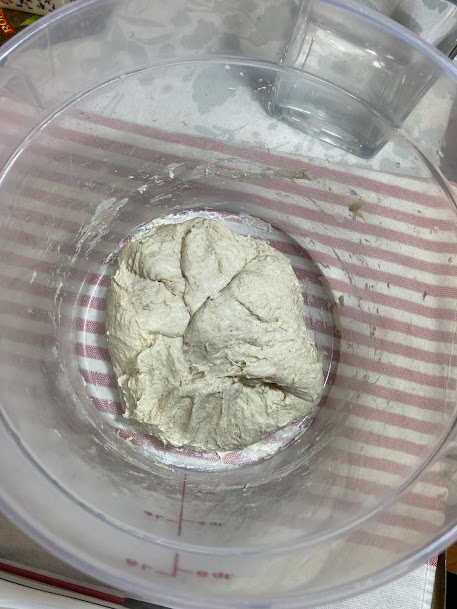
Once you’ve got these ingredients in your container, go ahead and mix them together. The best way to do this in my experience is to go around the bowl and pull each side over the top of the mixture, enclosing the salt and levain like an envelope. If it isn’t totally enclosed that’s fine, we’re flexible here. Then use your thumb and forefinger to pinch off little bun-sized balls. I made 8 or 9. Then go around the bowl again pulling the dough from each edge over the top like an envelope. Continue this pinch-and-envelope technique a few more times until you no longer feel salt grains between your fingers. Then cover the container and let rest of 30 minutes.


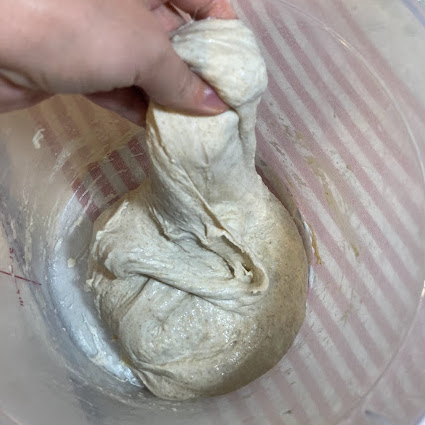
Step 6: Fold the Dough
Sourdough traditionally isn’t kneaded, but instead is “folded”. Really it’s just a way to say “knead but like… really gently”. Around 30 minutes after you finished mixing your dough it should have relaxed a bunch and filled out your container. Now it’s ready for its first fold! A fold basically means doing the envelope thing from the previous step again but without the pinching.
This is one fold:
- Place the container with the dough in it in front of you on a table and look at it. I know, it’s a circle, but whatever part of the circle is closest to you is now what I’m going to refer to as the bottom. And whatever part is furthest from you is the top. Whatever part is most to the left is the left and to the right is the right.
- Grab the top with both hands, stretch it up into the air, and then pull it down to the bottom as shown in the photos below.
- Grab the bottom with both hands, stretch it up into the air, and then pull it up to the “new” top.
- Grab the left side with both hands, stretch it up into the air, and then pull it over to the right.
- Grab the right side with both hands, stretch it up into the air, and then pull it over to the “new” left.
- Cover and let rest.
Perform this fold process a total of 4 times, each 30 minutes apart. After the last fold cover the container and let rest.


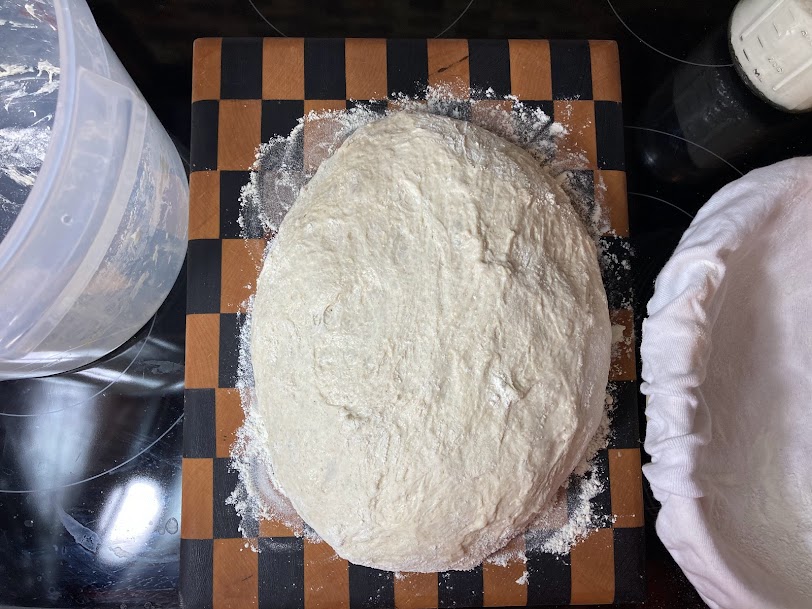
Step 7: Bulk Fermentation
This is the absolute easiest step of the entire process because all you have to do it nothing. You just go on with your life. Maybe go to sleep or something? Let your dough hang out covered on a counter or some other room temperature space. Do absolutely nothing until around 12-18 hours after your first mixed your dough. Then go look at it! It should be SUPER airy and puffy, and will jiggle when you move the container around. This is my favorite consistency of dough, it’s so soft and it makes me so happy.

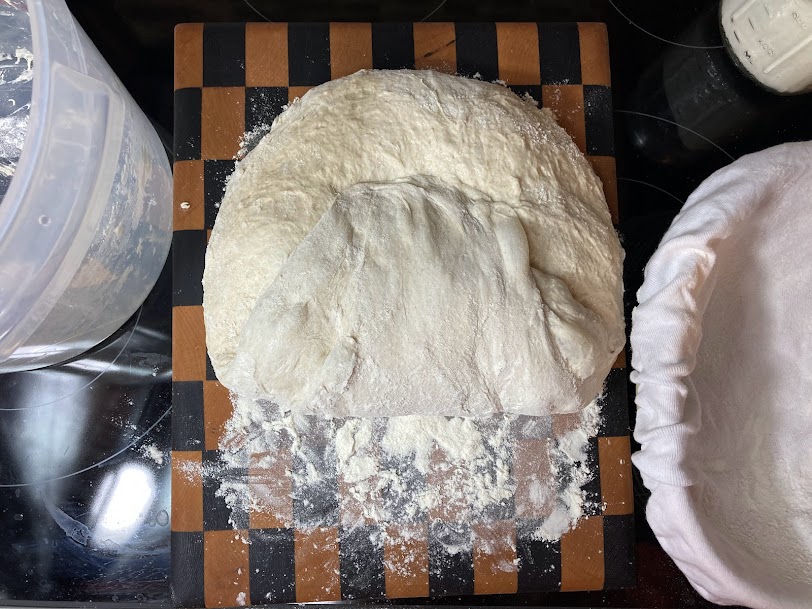
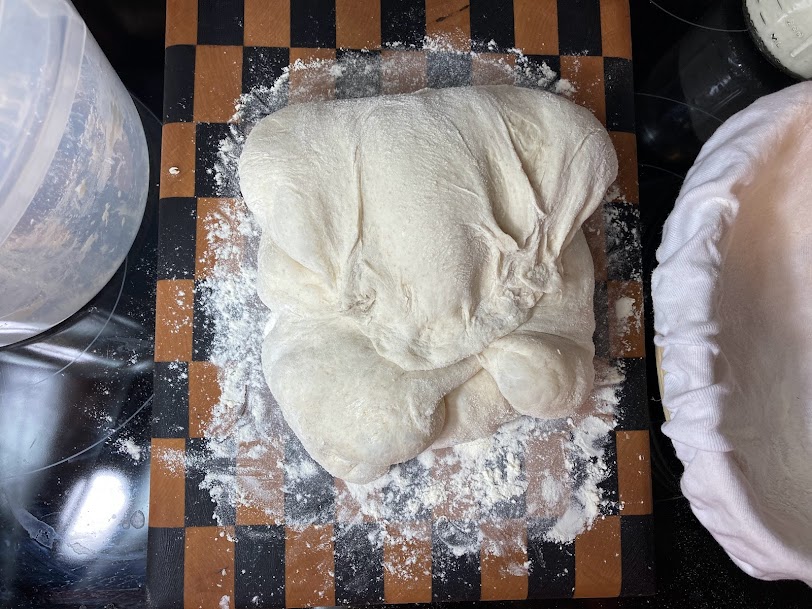
Step 8: Shaping the Dough
Now your dough is gorgeous and almost ready to bake! The next step is to shape the dough. That means building tension on the outside of your dough so that when you bake it it’ll look like a beautiful golden orb instead of a beautiful golden pancake. This might be the most fun step in this whole process because it’s super satisfying for basically no reason at all.
Steps to shape your dough:
- Gently pour your dough out of the container onto a lightly floured cutting board.
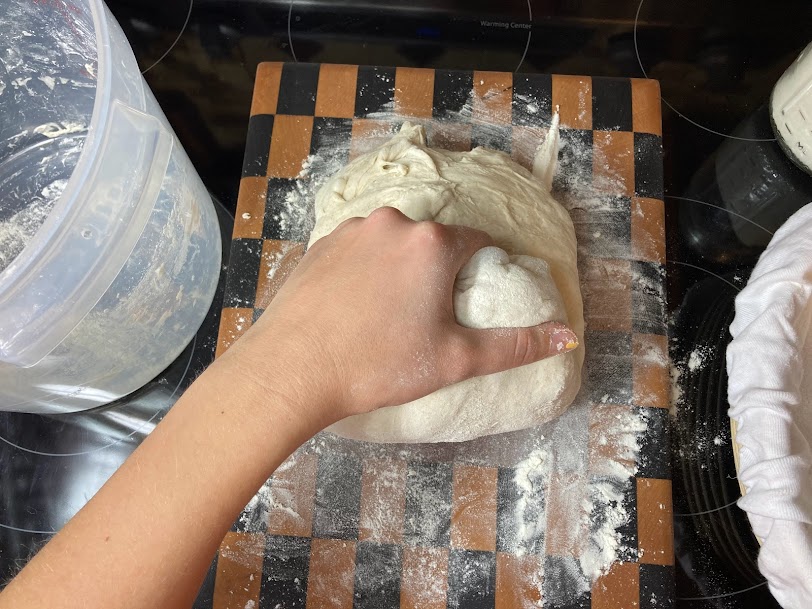
- Grab the bottom of the dough and fold it over towards the top.
- Grab the left side of the dough and fold it over towards the right.
- Grab the right side of the dough and fold it over towards the left.
- Grab the top of the dough and fold it over towards the bottom.
- Use your left hand to grab the left side of the dough, your right hand to grab the right side oft he dough, and pull them together to form a seam down the middle of the loaf.
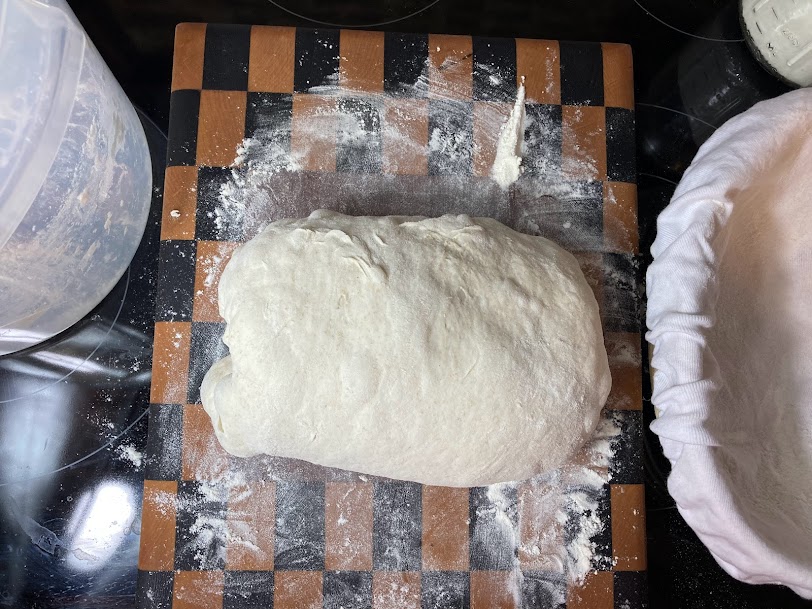
- Grab the bottom of the dough with both hands and roll it gently up towards the top
- Place your beautiful little package into a smallish bowl covered with a hand towel and dusted with flour.
- Cover with another dish towel and set aside.


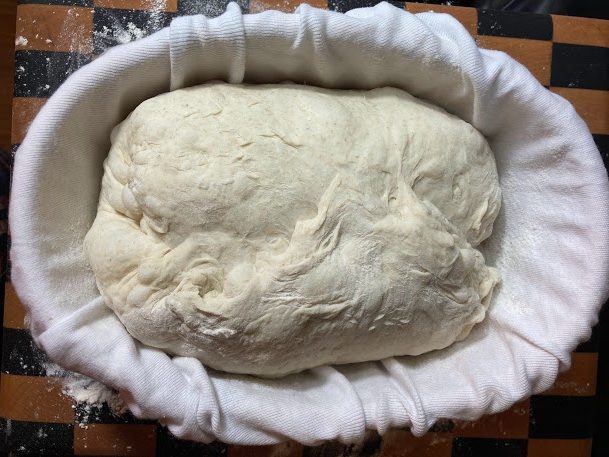
Step 9: Second Rise
This is the second easiest step of the bread making process because once again all you have to do is *nothing*. Let the dough sit for around 4 hours at room temperature. At about 3.5 hour you should preheat your oven to 375 degrees F. If you’re thinking you can save some heat and start preheating the oven a little later, you may want to reconsider. It really takes at least 30 minutes to properly heat your oven and your cooking implement. At the time you turn your oven on you should also put your dutch oven with lid into the oven so it can heat up as well. I’ve tried baking bread in a bunch of different implements, but the way a dense pot with a lid retains heat and steam really brings the magic. Feel free to use whatever you have, but this is what I’ve found works best.
After the 4 hours your dough should have risen a moderate bit in the bowl you put it in and it’s ready for the big event!


Step 10: Bake!
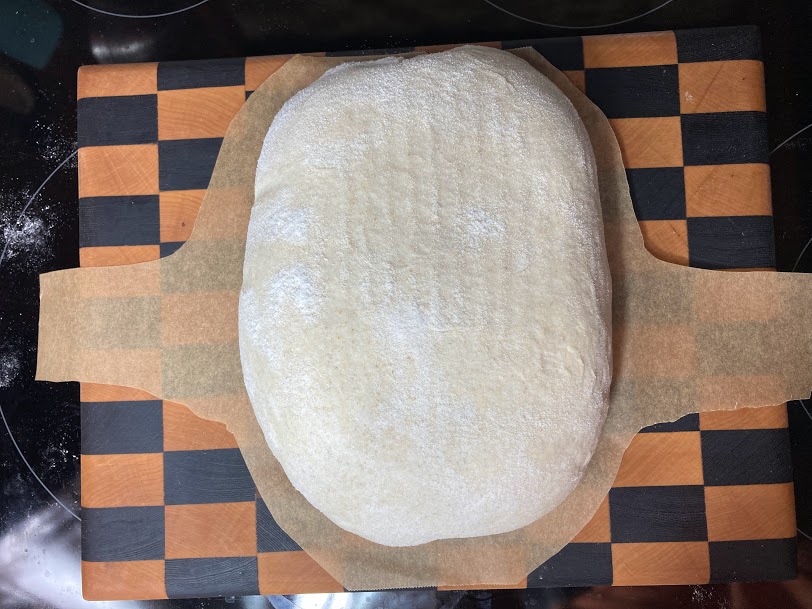
Put a piece of parchment paper down on your counter and carefully turn your dough out onto it. You can choose to not use parchment paper if you want, but that scares me. The next thing I do, which to be fair is kinda extra, is to trim the parchment paper to have little handles on either side. You absolutely don’t have to do that. Then using a very sharp knife or razor blade cut a slice in a crescent shape down the side of your bread. If you don’t do this your bread won’t be able to rise to its full potential, so it’s important! You put in all this work and you want to see it through!
Carefully remove the dutch oven or covered baking dish from the oven. Remove the top and *super carefully* lower your bread on the parchment paper into the dish. Replace the top and put the whole thing in the oven.


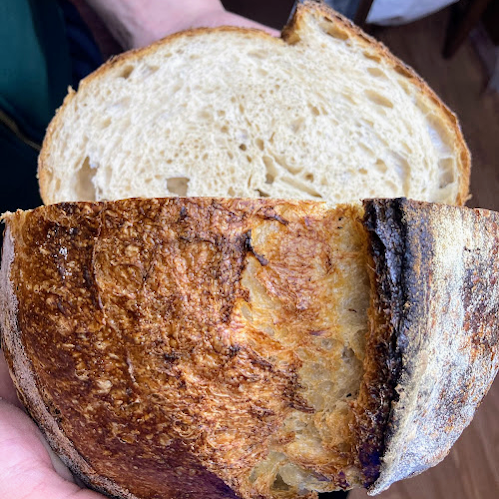
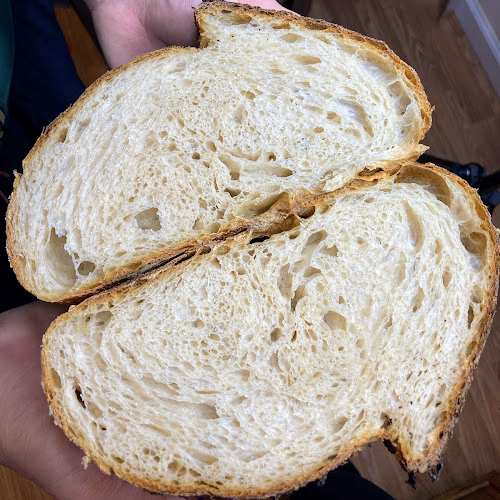
Bake covered for 30 minutes, then remove the cover and continue to bake uncovered for another 20 minutes. When your bread is finished baking use the parchment paper or a spatula to remove the bread as soon as possible and place it on a cooling rack. This will help your crust stay crispy and will keep the bottom from getting soggy.
Voila! You did it!

Overnight White Sourdough Recipe
Ingredients
Levain
- 25g sourdough starter
- 125g warm water
- 25g whole wheat flour
- 100g white flour
Autolyse
- 380g white flour
- 35g whole wheat flour
- 25g rye flour (or whole wheat)
- 340g water
Final Bread
- All of autolyse
- 2 tsp salt
- 110g levain
Instructions
Day 1
- Around 7am: Mix the levain using the sourdough starter, water, whole wheat flour, and white flour in the levain recipe, stirring until well combined. Cover and let rest at room temperature for 8-12 hours.
- Around 4pm: Mix the white flour, wheat flour, rye flour, and water for the autolyse. Combine until you don’t see any dry flour remaining in your container. The dough will be quite think at this point so it make take a little muscle to incorporate all of the flour. Cover and let rest.
- Around 4:30pm: Add the salt and 110g levain to your autolyse mixture. Fold in the salt and levain as much as possible, then use your thumb and forefinger to pinch of balls between the size of a golf ball and a baseball. When this is done, fold around the bowl again. Continue to pinch and fold until you no longer feel grains of salt between your fingers. Cover and let rest.
- Around 5pm: Fold the dough by grabbing the top of the dough and pulling it toward you then grabbing the bottom of the dough and pulling it away from you, like a tri-fold pamphlet. Then turn the bowl 90 degrees and repeat the pamphlet fold.
- Between 5:30 and 9pm: Fold the dough 3 more times using the method described in the previous step.
- Around 9pm-7am: Let the dough rest covered at room temperature.
Day 2
- Around 7am: Prepare a small mixing bowl by covering it with a kitchen town and pushing the towel into the bowl to contact the inside. Coat the towel with flour where it sits over the opening of the bowl. Gently coax your dough out of the container onto a lightly floured cutting board. It should be quite puffy at this stage.
- Around 7:05am: Shape the dough by folding it like an envelope. Start by pulling the bottom away from you, then pull the left side up and over to the right and the right side up and over to the left. Lastly, pull the top of the dough over everything else towards the bottom. Now your bread is lightly shaped. Next, grab the left side of the dough with your left hand and the right side of the dough with your right hand. Pull them together to create a seam in the middle of the bread running vertically. To make a tight ball grab the bottom of your dough with both hands and roll it up towards the top like a yoga mat. Pinch the seams together where needed.
- Around 7:10am: Transfer the shaped dough to the flour-coated bowl seam-side up. Cover with another kitchen towel and let rest for around 4 hours.
- Around 10:30am: Place a covered dutch oven in the oven and preheat the oven to 475 degrees F. If you don’t have a dutch oven you can you use oven safe dish with a cover. If you don’t have that you can use a baking sheet, but you may not get the crispy crust you’re expecting.
- Around 11am: Lay out a piece of parchment paper on a surface. Gently flip your dough out of the bowl onto the parchment paper and cut a crescent shape into the dough from the top all the way to the bottom. Remove your dutch oven from the oven, remove the lid, and carefully lower your dough inside. Replace the lid and place the whole thing in the oven. Bake covered for 30 mins.
- Around 11:30am: Take the dutch oven out of the oven, remove the lid, and place it back in the oven for another 20 mins.
- Around 11:50am: Remove your bread from the oven and transfer it immediately to a drying rack using a spatula or whatever you have available. Let cool completely before cutting!

Glad to see you back in my inbox!
LikeLiked by 1 person